
PowerShell - Let's create custom objects
Welcome back to the ppac Attack series, especially in this PowerShell mini-series.
Last time we’ve used PowerShell ISE to solve Craig’s challenge. It was about how to use variables and the pipe as well. This will come in handy this week, because this time we’re going to look at objects in PowerShell.
The good thing is, that PowerShell is an objected oriented scripting language. That means, basically almost everything in PowerShell is an object. Files you retrieve can be objects, directories can be objects, if you re-direct them with the pipe command.
But to make this blog a little bit more helpful, we’re going to look at custom objects and how we can use them to make us better at administering Power Platform.
What are PowerShell (custom) objects?
Custom objects are objects that you can create yourself to make your life a bit easier. That means, objects are another fundamental building blog, a bit like variables. As well as defining what value is stored in our variable, we can define what’s inside our object.
Anatomy of a PowerShell object
Objects are a collection of properties and methods:
- Properties describe the characteristics of an object, for example name, type, age, etc.
- Methods on the other hand describe actions that you can perform on the object.
You can create your own custom objects by using the following syntax: @{} (someone said this was also known as a hash table or associative array, but I’ve never used those terms)
Objects are usually used with variables, which makes it easier to deal with them. Technically you can use an object without a variable, but don’t. Just don’t.
 This makes total sense to me visually. Having worked with JSON for seemingly ages now, we define objects in the same way – inside curly brackets. Things might be referenced differently but the construction is almost the same. It helps when there’s familiarities as it makes it easier to apply knowledge from one syntax to another.
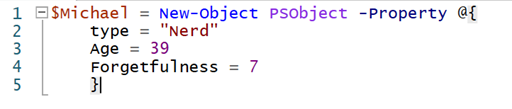
Here we have an object, inside the variable “$Michael”. The properties of this object are within the @{} syntax:
Type = Nerd
Age = 39
Forgetfulness = 7
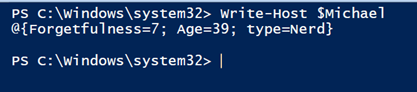
If we use the Write-Host cmdlet, we get the properties of the object:
Let’s get creating
Alright, this is fun. How about a bit more Power Platform context?
Customizing the DLP error message requires an object, so let’s have a closer look. The documentation for setting the DLP error message says this cmdlet requires two parameters to work:
- A string (in this case the TenandtId)
- An Object (in this case the error settings)

Or if you would like a version you can copy-paste:
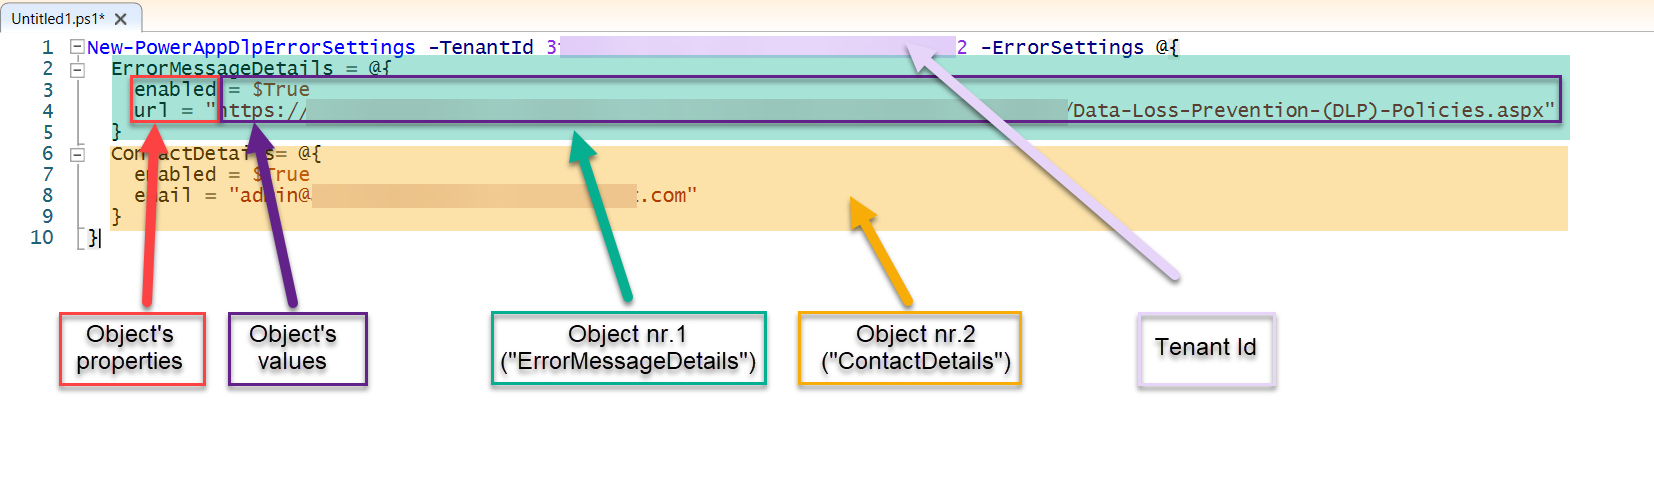
New-PowerAppDlpErrorSettings -TenantId 'TenantId' -ErrorSettings @{
  ErrorMessageDetails = @{
    enabled = $True
    url = "https://contoso.org/governanceMaterial"
  }
  ContactDetails= @{
    enabled = $True
    email = "admin@contoso.com"
  }
}
When we put in our tenant ID, we then need to put in the Error Settings Object.
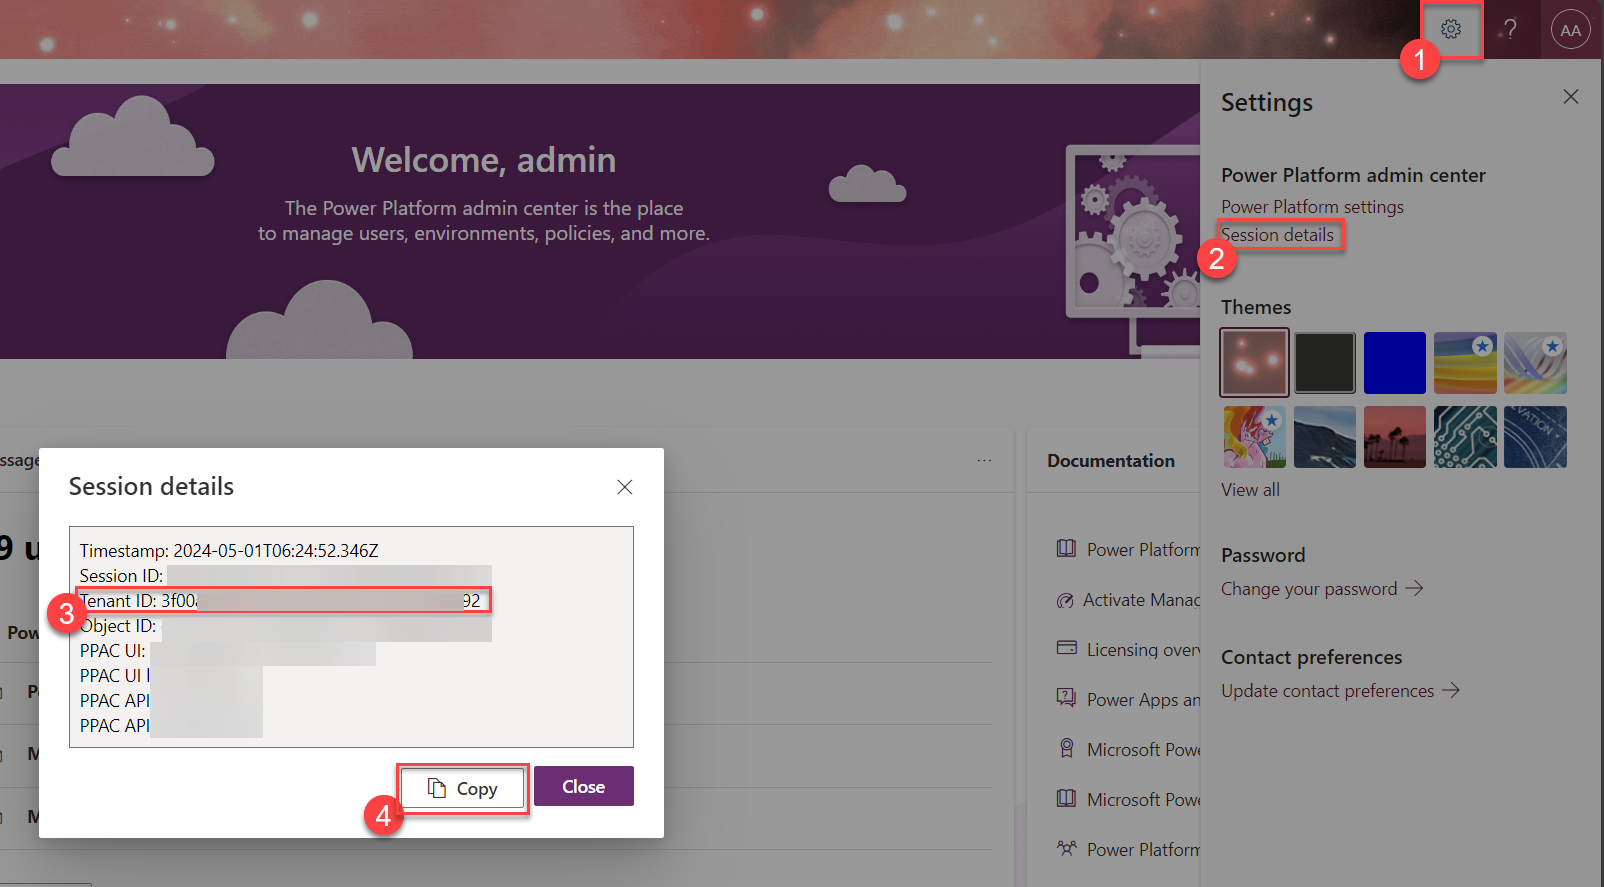
Wait a minute, where do I find my tenand ID? Okay fair, question. Regardles if you are in the admin center or in the maker studio, select the cog-wheel in the upper right corner and select Session details, the a window pops up and you can get the Tenant ID from there.
And this ErrorSettings objects consists of two other objects again: ErrorMessageDetails and ContactDetails (at this point I’m missing some knowledge. I don’t know how to find out which sub-objects a custom object can consist of. In this case it is the sub-objects “ErrorMessageDetails” and “ContactDetails”).

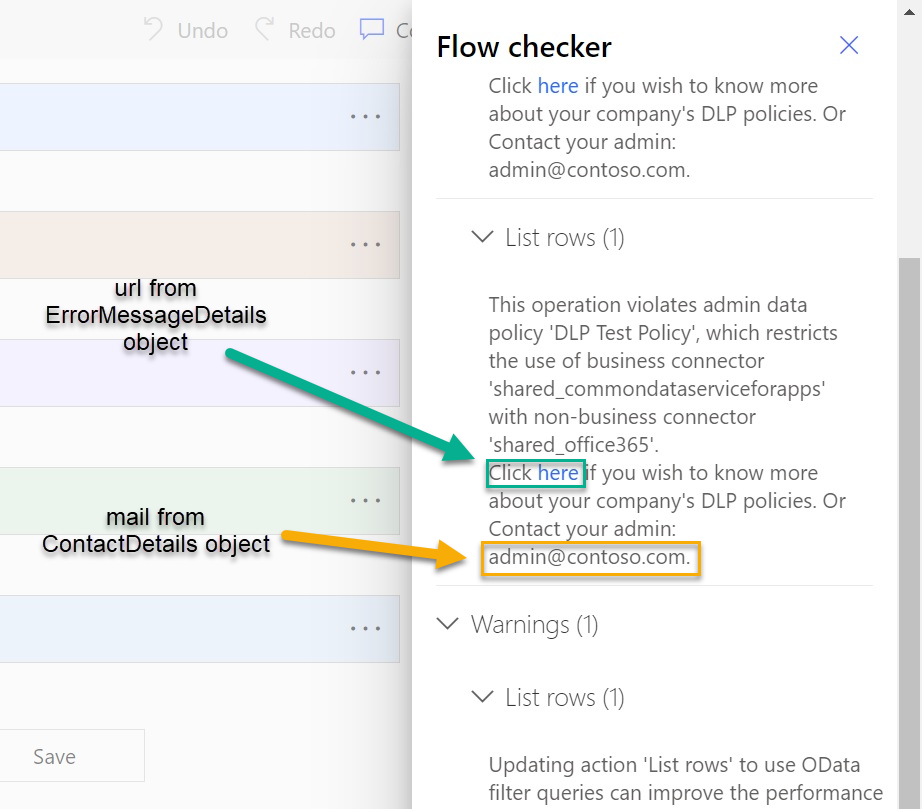
Let’s make it a bit clearer and see, what’s what:
It’s interesting to see, how this looks in real life, when a user’s flow or app breaks a DLP policy.
You have the possibility to provide some more information around DLPs or the Power Platform in general (you can provide the URL where you have more information) and also share a mail address to the helpdesk or an admin or to whomever may be able to help 😊
You can find the (official documentation here)[https://learn.microsoft.com/en-us/power-platform/admin/powerapps-powershell#governance-error-message-content-commands].
What else can we do?
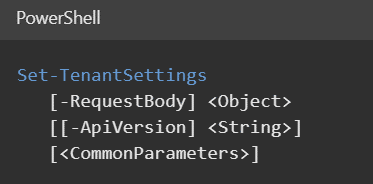
The documentation tells us, that Set-TenantSettings requires an object as well.
At first, let’s see what the tenant settings actually are. We know how to do that already, we use the cmdlet Get-TenantSettings and this is the output:
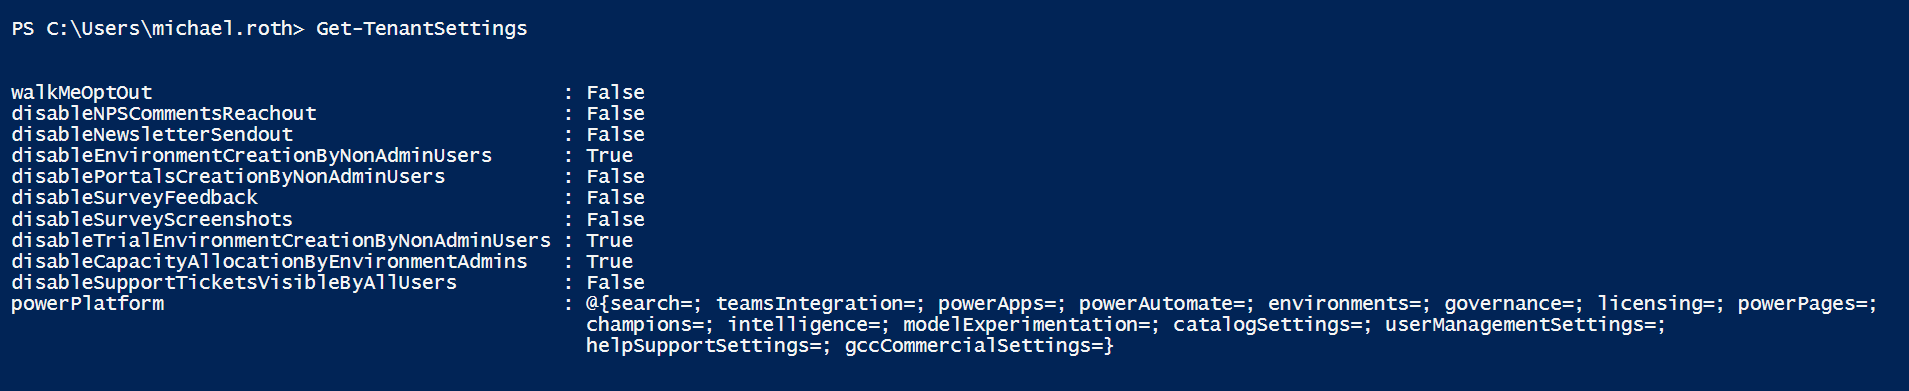
There is a whole list of features with a corresponding value, either false or true. With using a request body (which is a custom object), we can change those settings. Let’s try it out:
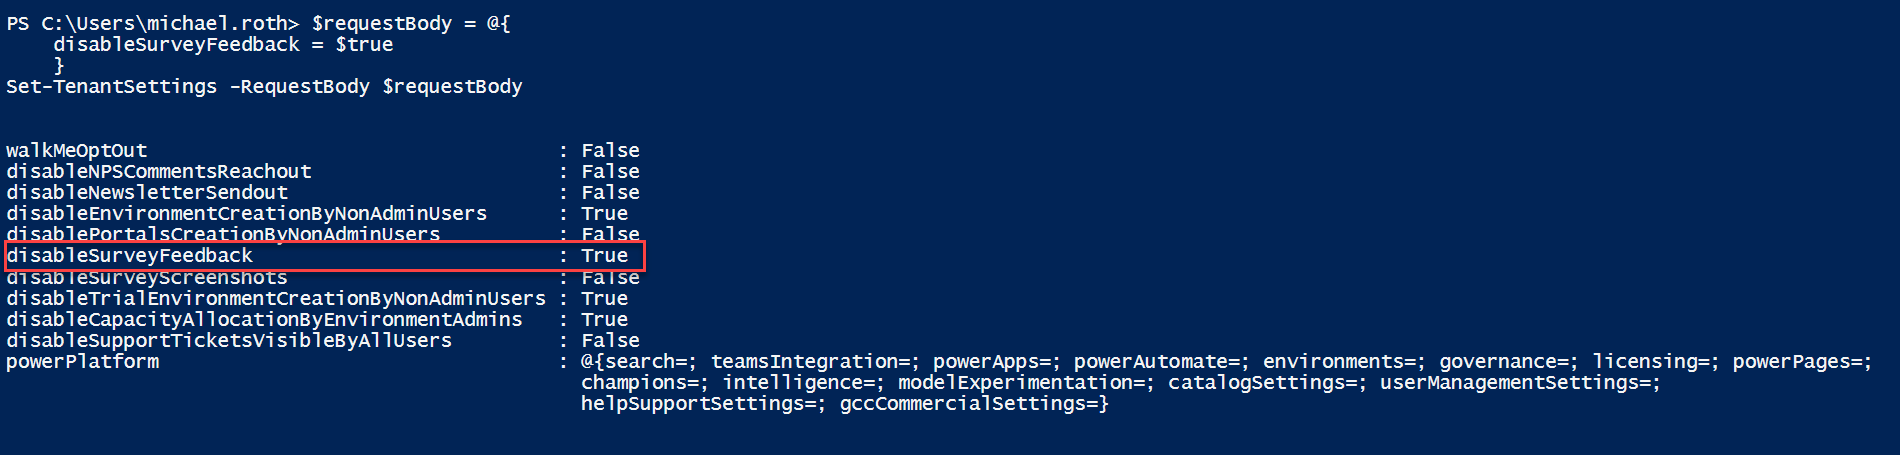
We define our request body and put it in a variable (indicated by the $-sign)
$requestBody = @{
	disableSurveyFeedback = $true
	}
Now we follow the documentation and put together the cmdlet and fill in our request body as well. Now the script looks like this:
$requestBody = @{
	disableSurveyFeedback = $true
	}
Set-TenantSettings -RequestBody $requestBody
This is one of the best ways to change all the tenant settings, even if they’re not in the UI of the admin center 😎
This is awesome to know. Especially important as some features can easily be turned ON via PPAC, but can only be turned OFF via PowerShell. Looking at you, Managed Environments 😂
Of course, we can put more than one property in an object and change multiple settings at once. For example:
$requestBody = @{
	disableSurveyFeedback = $true
  	  walkMeOptOut = $true
	}
Set-TenantSettings -RequestBody $requestBody
But wait, there’s more – dot notation
You may have noticed that there is one property in the tenant settings at the very end of the list, that looks very much like an object.

Behind this property you can find a lot more settings for specific services. But how do you access them?
Well, if you’re familiar with PowerFX, then you probably have heard about dot-notation. We can access nested properties by using the dot notation, that works in PowerFX as well as in PowerShell.
So if we want to see, what’s inside the Power Apps property of the Power Platform property, we can use the dot-notation. And we already learned that the write-host cmdlet is helpful to show us information in the console, we can use this:
Write-host (Get-TenantSettings).powerPlatform.powerApps
The parenthesis are necessary to indicate to use this cmdlet (and not let it be just written in the console) and from there on we can navigate through nested properties, just like in PowerFX.
A lot of people prefer the usage of a variable here as well, so instead of my version, you will find something like this way more common:
$settings = Get-Tenantsettings
write-Host $settings.powerPlatform.powerApps
Both versions work the same though.
And with that I’d like to encourage you to navigate through the Power Platform settings which are not in the UI to see what you can find. One of my favourites is, that I can customize the storage limit for consumption warnings in environments from 85% to whatever I like. Can you find it?
Conclusion
That’s a wrap for todays little adventure; we’ve put our knowledge from the weeks before into practice and learned the syntax of custom objects, which works for all kind of objects, including request bodies.
We talked about changing the error message of DLP violations and how to change it, as well as the hidden Power Platform settings.
Next week we’re going through my favourite PowerShell scripts for Power Platform Admins, before we end this series with a real banger: the cross tenant isolation reports.
Thanks a lot for reading, and if you have comments, questions, or remarks, feel free to contact Craig or myself on social media. Usually, we’re happy to chat and help and learn 😉
Michael on Twitter and LinkedIn Craig on Twitter and LinkedIn
Thank you for reading!