
Start debugging your PowerApp
Make troubleshooting and understanding single elements easier.
They exist. Those little moments that drive you crazy. Things simply don’t work; they don’t work the way you imagined and you almost despair because it just doesn’t want to go on. Or they break. I swear I didn’t touch anything, yet all of a sudden, my functions are broken. WHAT THE HECK???
I’ve built a few apps by now and I always realize that I have a different view and approach than classic developers. I’m a citizen developer, with no IT knowledge and no technical background, and I’ve learned some useful techniques while building apps that I benefit from with every app. Really, with every app.
I have talked to many people and found that these little tips and tricks can save you a lot of nerves and a lot of frustration. If you haven’t read my blog about 9 things I wish I learned before I build my first Power App, you should check it out, but this one here is the next step. It’s not only about troubleshooting and debugging, but some of those tips will also just keep you sane or teach you good habits that will make your app building experience easier.
So, let’s lift our troubleshoot and debugging experience on the next level 🙂
Keep calm and let’s build apps.
1. Duplicate your screen
Remember my tip to build your app step by step? If you don’t add all the functionality at once, your app grows over time. At some point your pretty satisfied with your app but you want to try out new things and add others.
If you don’t know how some functions work exactly, always duplicate your screen, before adding new things.
While building your app and adding new functions, you need to add things, you need to delete others to make it work. And you don’t want to mess with the progress you’ve made so far.
A duplicated screen is like an additional save game slot, just to make sure. If you break everything, you can always go back.
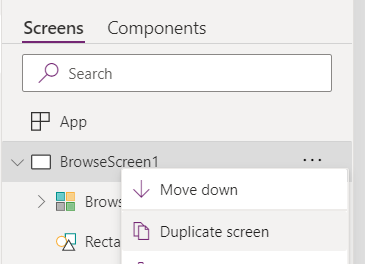
Duplicate your screen before trying out new things
2. Use debug label
Label are a life saver in PowerApps. They literally make things visible. Let me show you an example. I have a time app and I control the timer with a variable called Uhr_tickt. If it’s set to true, the clock is ticking, if it’s set to false it isn’t. The “Go!” button sets the variable to true, the stop button sets it to false.
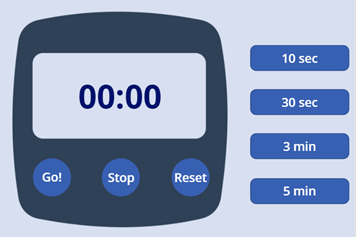
The main function panel of my timer app
While testing your app and adding a new functionality, I tried to make the Reset button work and had a hard time figuring out, why it wasn’t working. Quite often it was because my variable Uhr-tickt wasn’t set the correct way. Is my timer not starting, because the UpdateContext function for my variable wasn’t working or was it something else?
That’s when I added a debug label. It’s a simple label that shows you the status of your variable. This way you can actually see, what’s happening in the background, making debugging and troubleshooting so much easier.
Demonstrating how debug label can give you information of the state of a varible
3. Build a button
Build a button to test a function. If it works, include it in your desired function.
I’ve said this a million times before, but it is the most helpful habit, ever. If you want to add a new functionality, don’t put it on top of that main function you have. Insert a button and try the new functionality on that button. If it works, add it to the place where you want to have it.
But if it doesn’t work, you will never wonder where the error is.
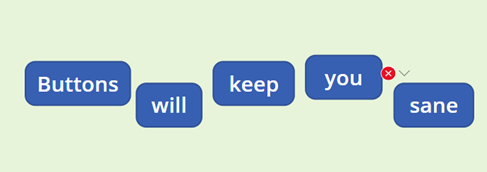
Buttons help you try out new features
4. Snap to align
Okay, this one is a mini tipp: Did you ever try to align some buttons or elements and the snap to align functionality drives you crazy? Often it helps to arrange your elements but sometimes it’s your worst enemy.
Did you know, that you can disable this function by holding the Alt-Key while placing elements? 🤯🤯🤯
5. Use more Excel
Whaaaat? More Excel, are you sure? Okay, hear me out. Did you know, that Power FX (the syntax used in Power Apps) is based to Excel functionalities.
I’m pretty sure you’ve seen that If-Statement before, haven’t you? That is because Power FX is designed for people who are familiar with Excel functions.
But how can we make use of it?
I often have a hard time trying to visualize how my data sources work. If I want to write a functional VLOOKUP function, I need to see my tables. That can be difficult with PowerApps because your tables may be anywhere. Somebody gave me the tip to try out difficult functions (AN: like nested if-functions) (another AN: Try to avoid nested if-functions at ALL costs) in Excel. When they work you can replace the fields in your formula with the fields you need in your PowerApp.
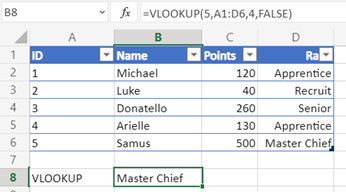
Try how the VLOOKUP functions works before adding it to a Power App
6. …but it worked a minute ago
Do you know that: You swear you haven’t touched anything, yet all of sudden nothing works anymore? I’ve been there too, and still am from time to time. It happens. Here’s what you do, first thing:
Check your connections. Are they all working fine? No? Go fix them.
Did you just change anything in your data source? Are you sure? Update them anyway.
Did that help already? Good, I thought so.
Check your connections and data sources every once in a while. If you add another column to that SharePoint list and didn’t update your data source….well. It’s a common pitfall, just remember to check those things.
Something else about data sources. If you use SharePoint or Excel in your OneDrive (and yes, both can be very valid data sources, don’t let any “IT pro” tell you something different), consider that not everyone in your organization has access to those. If you published and shared your app, ask yourself if everyone who wants to use it has access to the data source you used.
7. Name the elements you use, as you build them
Develop the habit of re-naming your screens and elements as you build them. That will keep you a lot of frustration and time. Especially if you have multiple screens, apps can become crowdy. So every time you add another function or you want to try something new, unnamed elements can not only cause unnecessary extra work to find the right element you’re looking for. It can also be frustrating, when you keep adding the wrong elements to your function and that causes it to not work. It can be a serious source of errors.
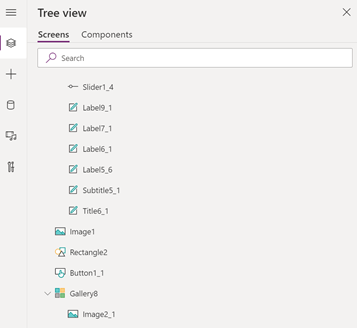
Which label shows you variable and which is just some explanatory text? 😁
8. Learn what the result view is
I haven’t used it for too long because nobody explained it to me. But this a so important to understand in order to learn what it needs for functions to work properly. If you click on functions you can get two important views. The result view and the data type.
By clicking on Office365User the formular bar shows you the original record with all elements.
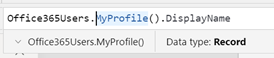
If it’s not showing at first, click on the little arrow next to the function.
The result view shows what data is in a record or table
This way you can see, what kind of records are stored and what data you can work with.
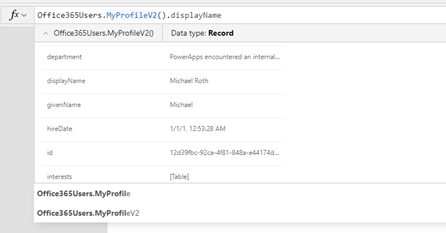
If you click on the next part of the function DisplayName Power Apps will show you what this function does AND what data type you get.

The result view also shows you what kind of data you’re dealing with
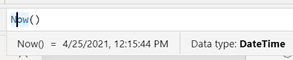
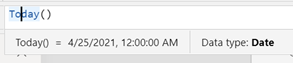
That helps you understanding complex formulars (try it with a filter function to examine what it does) and also how to work with the data. Do you know the error message “This formula expects data of the type value”? If a functions give you data type text, like in the Office365Users example above, you can’t use it in a function that needs a value to work. Here is a comparison between the Now() and the Today() function. The output looks similar, but it’s different data types. DateTime is some else than Date.
The formular bar shows it to you, which might help you debugging your app and functions.
9. Dear Diary….
Document what you just learned. Like a learning diary. You will need this knowledge later and you can recycle bits and pieces you’ve once build again and again. Already countless times I was relieved to have written down insights and functions. That way, I can always check back to see how they work. This saves me a lot of time and above all frustration.
Also, the brain processes things differently when you not only think about them but write them down. This additional occupation with learning content consolidates what you just learned.
10. The world gains beauty through all its colors
If you want to make your app pretty and professional (I recommend Luise Freese’s latest blog “How to beautify your Power Apps” on that) you want to use more then the set of standard colors. But I can be a lot of work to paste all the color codes in every single element you have in your app.
But it’s very handy to set your colors in labels to make sure you can quickly use the correct colors.
Set up a label for every color you want to use and set the Color value as you like. To not get confused later on, set the Text value to something clear, like BackgroundColor or IconColor and remember to rename the labels in the Tree view as well (see tipp #7).
Now, whenever you want to use that color you don’t need to remember or copy the Hexcode, but just set the value to your color label by using IconColor.Color.
Quick, easy and you will always use the correct color without much effort.
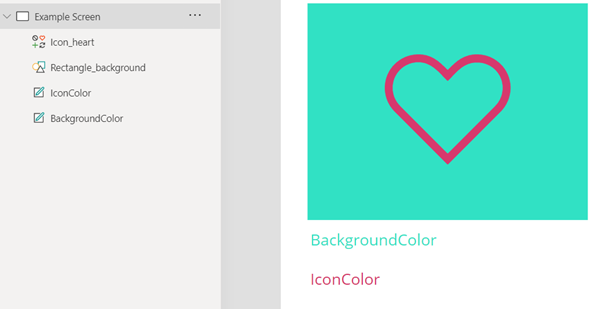
Two labels for my most used colors

Fill value of the Rectangle_background

Color value of the Icon_heart
There we have it. That are 10 tipps on how to start debugging your app.
Do you like them? Do you have more tipps for me? I’m always happy to get new ideas and hints because I am far from being an expert and I’m always learning 🙂
If you’d like to help me out, reach out to me on Twitter or LinkedIn.