How to start blogging with VSCode
How to start blogging with VSCode
Prologue: This blog is going to describe how to write blog posts with VSCode and upload them with the terminal to GitHub. If you already have a GitHub repository (and you installed Git already) and you want to get more familiar with using VSCode and your terminal, this blog is for you.
What?
I’m trying to get more comfortable in Visual Studio Code, since I realize that it helps me develop a better understanding of tech.
Therefore I started to write my blog posts with VSCode and not with Microsoft Word anymore. From VSCode I commit then to GitHub, using the built-in terminal.
It’s not easy for me to get behind all this, but here is my short explanation of the why and the how, if you’d like to start with it as well 😊
Note: There are several ways to do this and I just explain the way I do it right now. This is not a introduction to GitHub in general or to working with terminals. Please feel free to let me know if I make assumptions and you can’t follow 😊
Why (should you care)?
I used to write my blogs with a text editor, e.g. Microsoft Word. It’s obvious, isn’t it? Use the right tool for the right job (use a text editor for writing texts). But there are a few benefits from using VSCode and GitHub for blogging:
-
I get a better understanding of how GitHub works. Open-source is an amazing idea and I would love to contribute more. Therefore it’s actually helpful to get better with GitHub. I created a repository in GitHub that contains all my texts and images that I need for my blog.
-
I familiarize myself with working in VSCode. I use the terminal on a regular basis (my approach works with the UI too). Working with a console and VSCode loses a bit of complexity and thus its horror 🙂
-
Since I blog for and with the tech community, I want to share my insights. This way I have very good control over what is still locally on my computer, and what’s already shared with the community. I can even check afterwards what exactly I did at any given time.
-
I don’t need to copy/paste my blogs from Word into a different tool (I know there are other options to reach this goal but hey…), which saves me a lot of time.
-
I get better at writing markdown 🤓
-
I have a very clear structure of my texts and images. I’m not very good at keeping things tidy, but GitHub gives me a good structure. It just works pretty good for me.
How does it work?
It’s actually not as complex as I thought it was. It’s three steps:
(0. Create a repository on GitHub to store your blog posts and images.)
-
Create a local copy of your GitHub repository
-
work in VSCode locally (in my case I write my blog)
-
upload your created content on GitHub
Now, let me guide you through each step for you to try it out for yourself.
Create a repository on GitHub to store your blog posts and images
Create a local copy of your GitHub repository
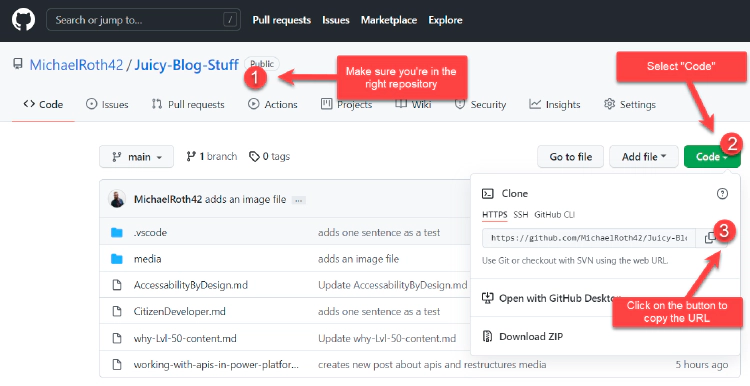
Actually that is something you need to do only the very first time, when you decide to try this approach. After you created a local copy, it’s just there (maybe you need to update it, but more about that later). To do this, you navigate to your GitHub repository and select Code and select the copy button to copy the URL of your repository.
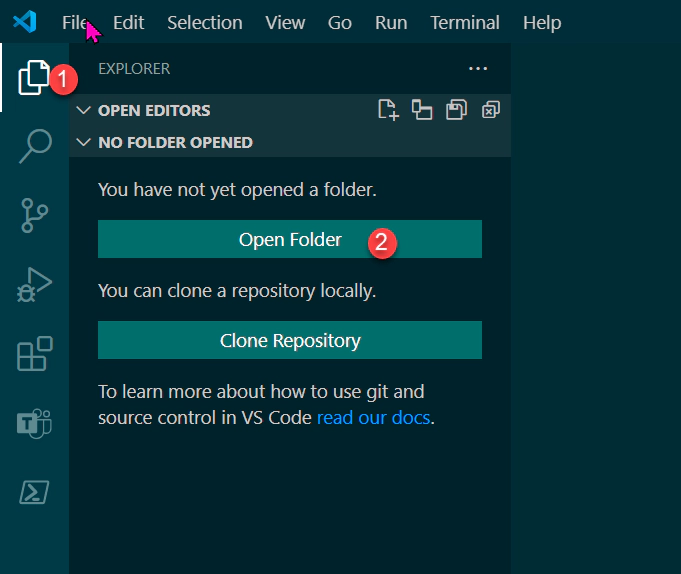
Create a parent folder locally where all your local copies of repositories shall live and open it in VSCode.
Now open the terminal to create the local copy of your GitHub repository (make sure that your terminal is in the local folder you just created). To clone the repository you will need this git command:
type git clone [url of your repository you copied earlier]
Congratulations, you just created a local copy of your GitHub repository. You should see it in the side panel of VSCode.

Work in VSCode locally
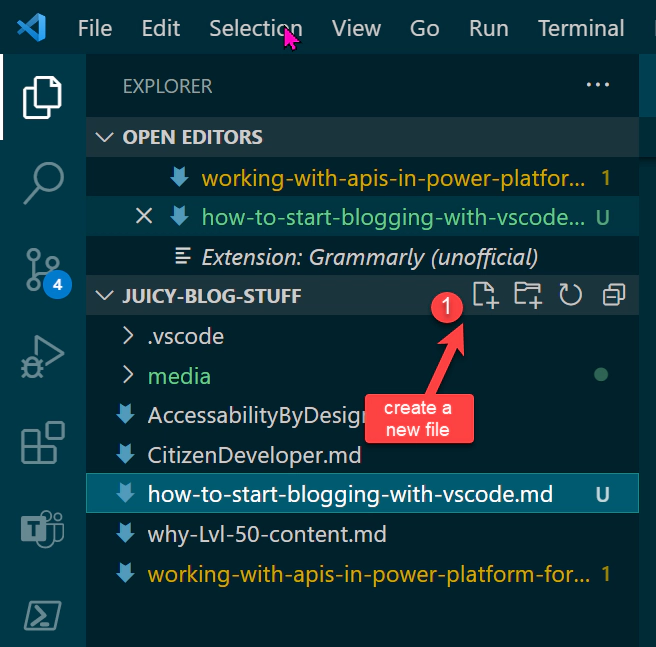
Now you can create a new file in your repository (I use the UI element on the left hand side). Make sure to let it end in .md to tell VSCode (and GitHub) that this is a markdown file.
Then you can start writing your text (there are a few extensions that I use, to make it easier, like the Docs Authoring Pack, Grammarly or the Code Spell Checker. Maybe I cover that in a different post or see to link a good resource for you).
Upload your content to GitHub
There are several different ways how to upload your content from your local clone to GitHub, yet as I mentioned earlier I want to get comfortable with using the terminal, so here’s what you need to do:
-
Add you content to the staging area by using
git add .
This command will put all changes that you made to the staging area. It’s not uploaded yet, that comes later. If you worked on multiple files and want to upload only some of them, there are different ways, but I won’t cover every possibility here. -
include a commit message by using
git commit -m "this is your message"
Including commit messages will help you later on to see, what you actually did. And I just learned that it is good practice to tell, what this commit does in third person, e.g. “adds new pictures” or “adds new chapter of the blog”. -
upload your content by using
git push
That command will upload your content from the staging area to GitHub.
Tadaa, look at you, you did it you bad-ass open-source rock star 🥳🤘🚀
P.S. When you come back to work on your content you should check, if your local copy is up to date by using git pull (make sure your terminal is in the right folder though). That command will check if there have been any changes in your repository and updates your local copy to the latest version. It’s not that important when you’re the only one working in your repository. But when you start collaborating with others it’s a good practice to acquire.