
PowerShell - ISE, modules and roles
This is the next post in our mini-series with PowerShell for Power Platform Administrators here at ppacAttack.
After we’ve learned how to start PowerShell in different modes, understood the general syntax and already got the first cool features covered (the help cmdlet, toggling through the last cmdlets, etc.), this week we’re going through PowerShell ISE, as well as all the modules that we’re going to need in our Power Platform life.
What is PowerShell ISE?
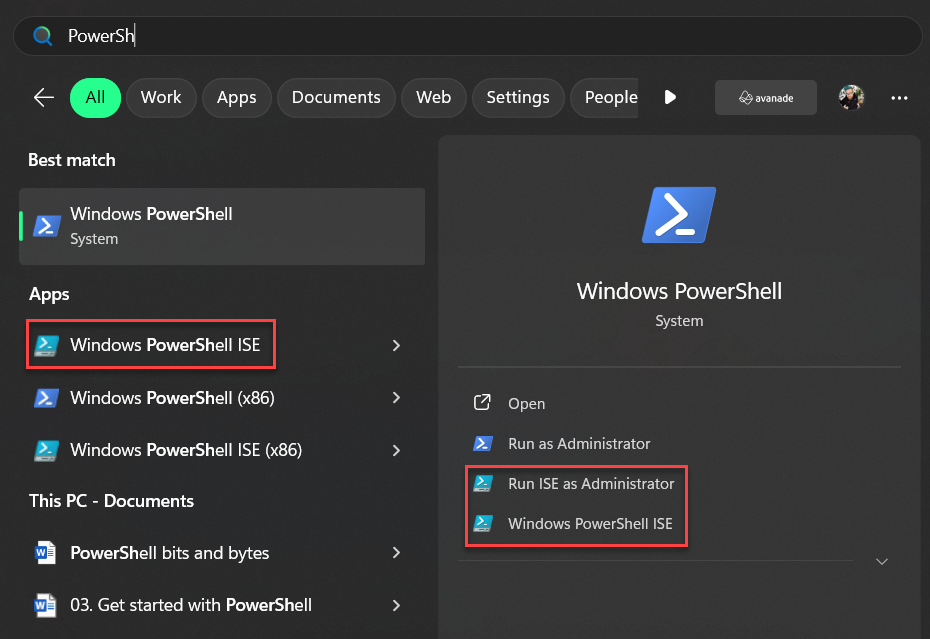
PowerShell as a command-line interface (or CLI, if you have a thing for abbreviations) is a tremendously useful tool and an integral part of Windows administration and automation. Therefore, it’s our best friend when administering Power Platform too, but when it comes to writing and debugging scripts (which for me makes up about 90% of the time 😅), ISE is the tool to use. ISE stands for Integrated Scripting Environment and usually is installed on all Windows PCs by default.
PowerShell ISE is a tool with a graphical user interface that helps you with scripting. My favorite features include:
- Multiline editing: You can insert an empty line and paragraphs, which makes writing multiline scripts so much easier than in PowerShell. In classic PowerShell you have to write everything in one line, as soon as you hit the enter key, the script starts running.
- Selective execution: ISE gives you the possibility to run only selected parts of a script, which is really useful for testing only specific parts or commands of a script (we will have a cool real-life example later on).
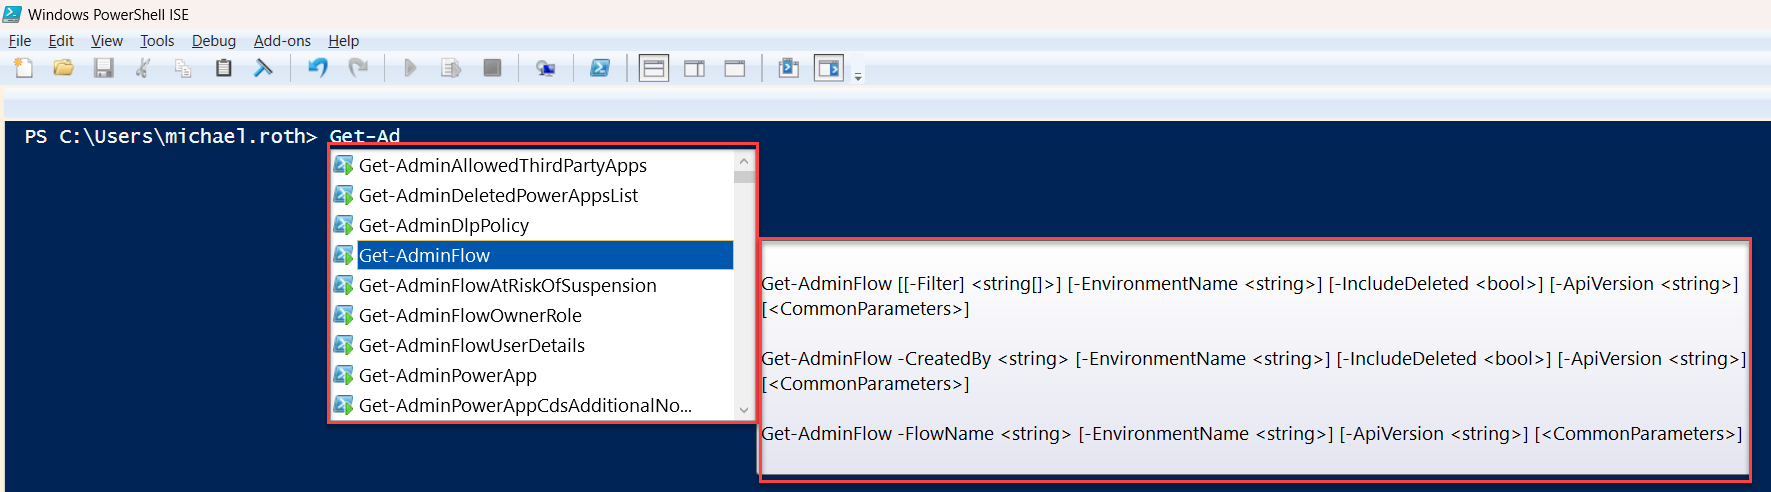
- IntelliSense: It’s a feature that originally comes from VS Code to help you write faster. When you start to type a command, ISE shows you a list of available commands on your machine. And not only that, it will also provide you the syntax and possibilities for that command as well.
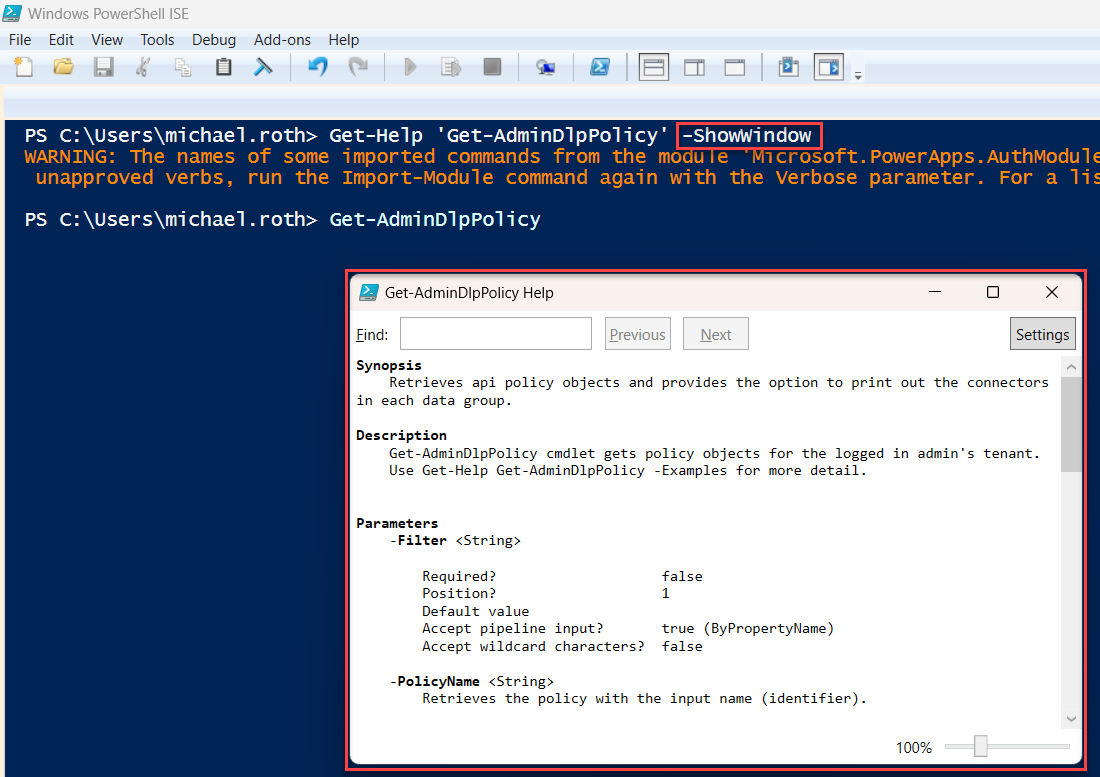
- Context sensitive help: Whenever you type a command, you can press the F1 key and the help text (we’ve talked about this in the first part of the series) opens automatically in a separate window. And I love to see the help in one window and edit my commands and scripts in a different one. I can see the help text while keep on working. That’s cool.
Differences between PowerShell and PowerShell ISE
The difference between PowerShell and PowerShell ISE are pretty obvious, when you just look at it. Well, we have a GUI and that defines a lot of differences:
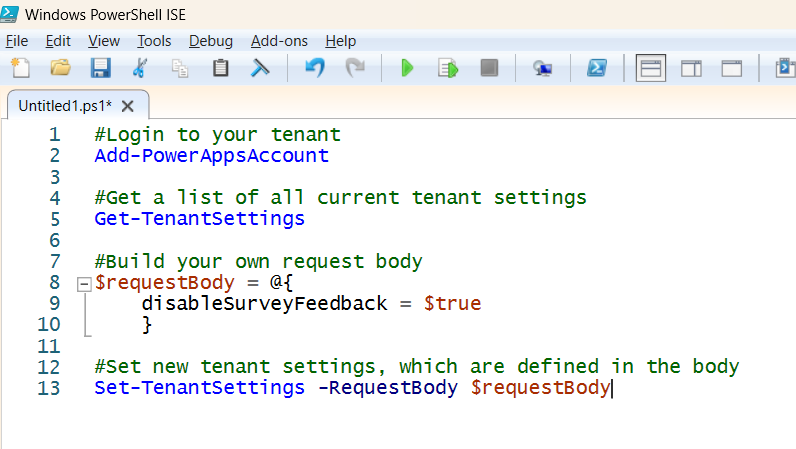
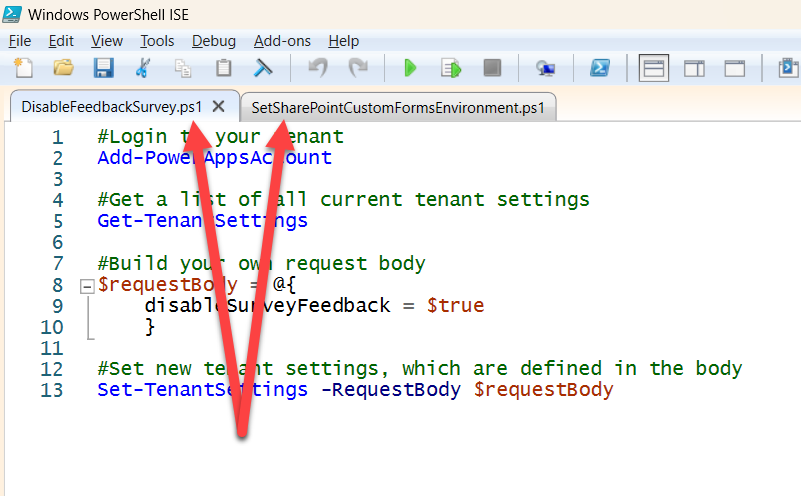
- Script pane: Again, this one is so helpful with writing multiline scripts. In this example we added comments (which you can do by adding a # in front of your text. Helps a lot with reading scripts) and have four different commands in one script. It’s easy to read and way more easy to write, than to write it all in one line in classic PowerShell.
- Tool bar: You can see it in the screenshots already, the toolbar gives you a lot of possibilities to make your scripting experience a lot easier. My favourite options are the Run Script options.
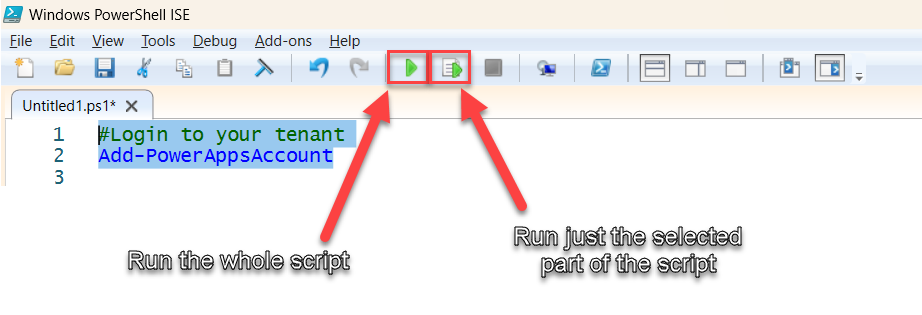
When you select the green arrow on the left, the whole script will start running. When you select the one on the right, only the part of the script will run, that you’ve selected. That is really helpful with testing dedicated parts of your script.
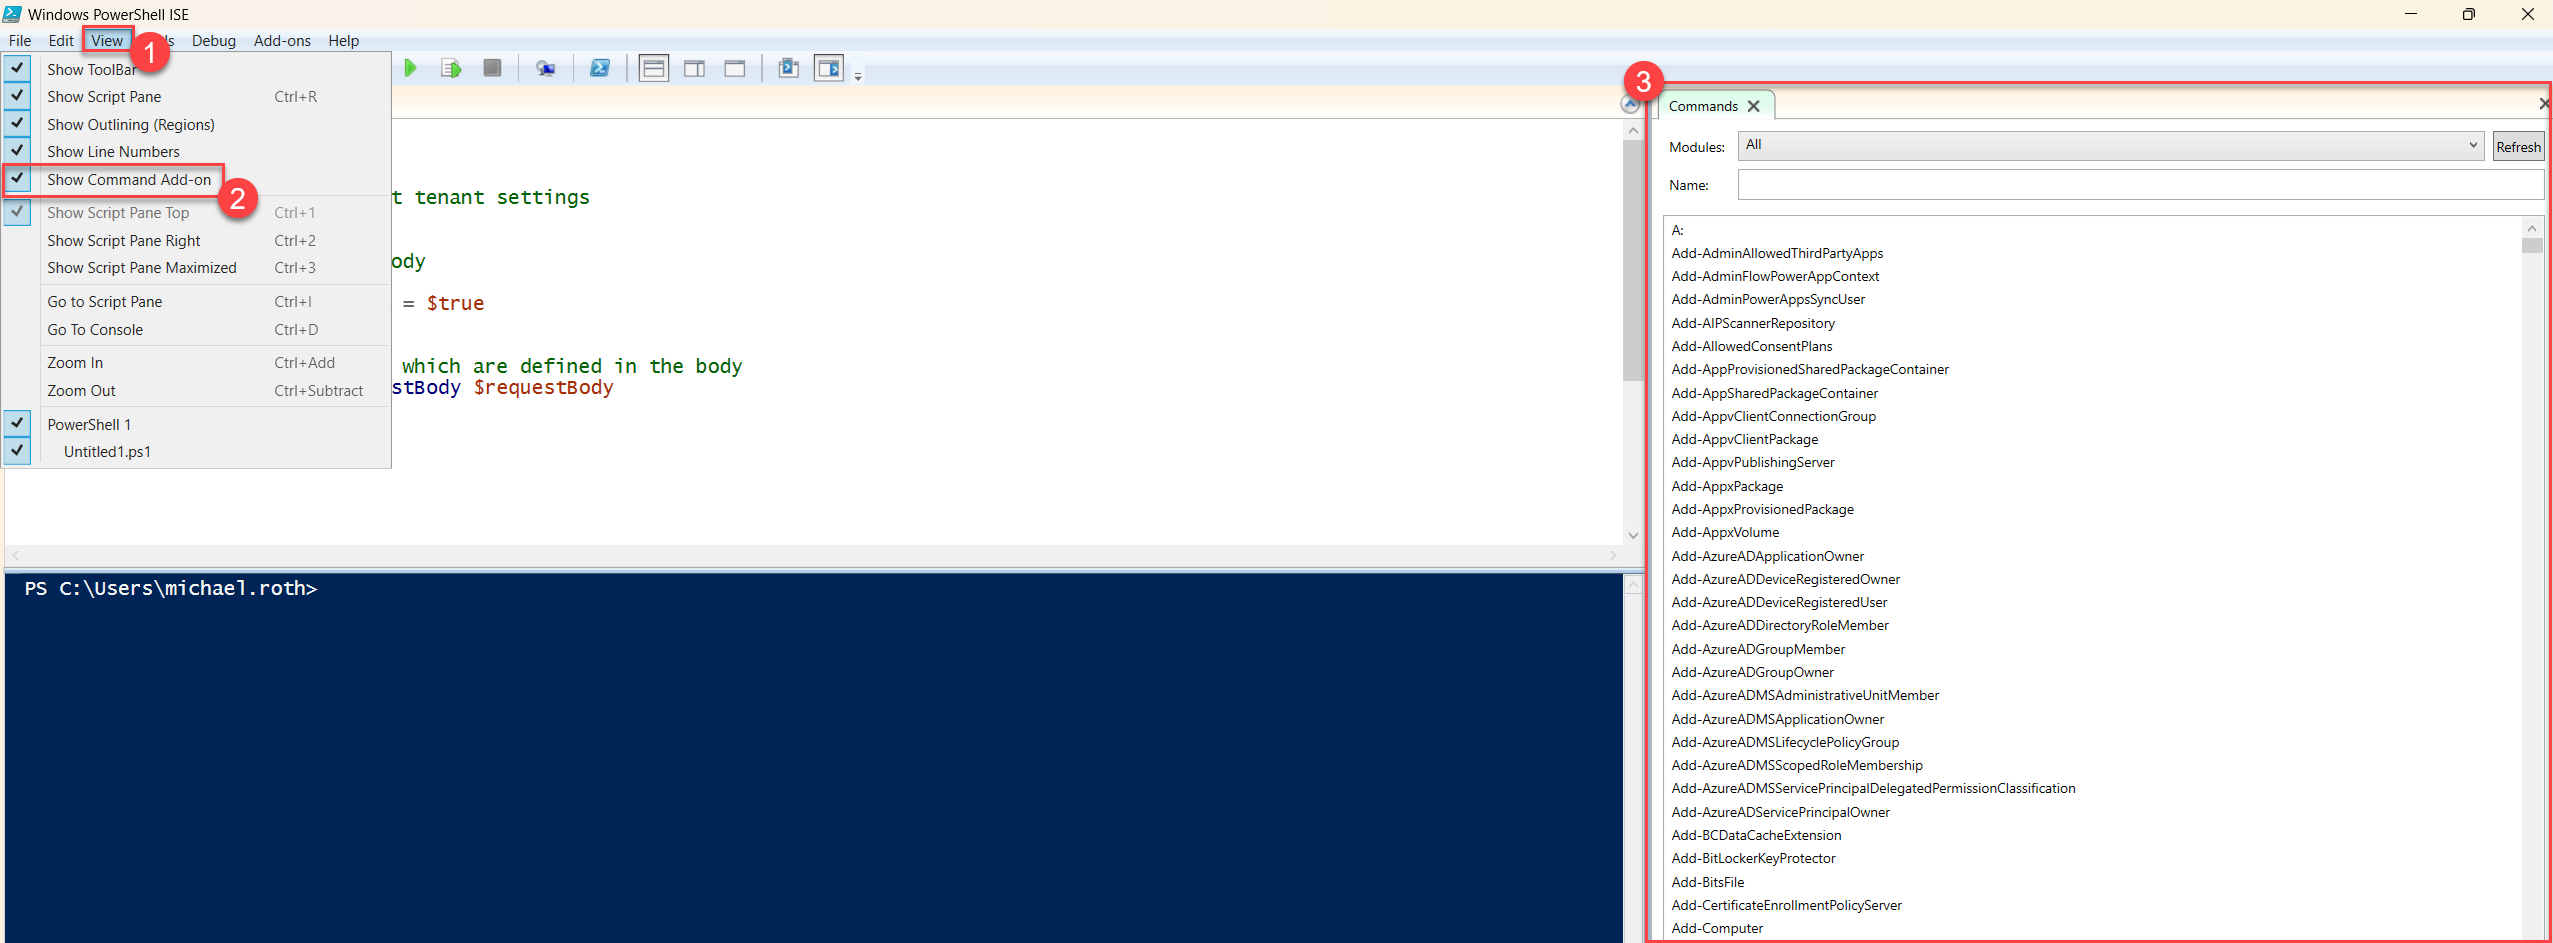
- Command Add on: You can decide whether you want to see it all the time or not, but it basically shows you ALL the commands from all the modules that are installed on your machine (if you have no idea what modules are, it’s in the next section of this blog). If you don’t see it, click on View –> Show Command Add-On and then you have a window on the right side of ISE. In this part you can filter for specific modules, search for commands and browse through all of them.
- Multiple tabs: What can I say, despite, you can work with multiple tabs at the same time?! I can finally use my unproductive ADHS working methods not only in a browser, but also when scripting 😅
 It’s not often I’ve used PowerShell in the past but when I have, this has always been my favourite version to use. The commenting really helps and as a visual person, I like things being coloured differently. It helps my brain to compartmentalize the different things going on in the script.
And yet, a warning
PowerShell ISE is no longer in active feature development, BUT there are no plans to remove it from Windows either. Microsoft aims to guide users towards VS Code with the PowerShell Extension, yet there are many, many users who still love the ISE and for good reasons. It’s a super comfortable tool (not to mention that sexy 90s look) that is still for many users the go-to choice. Just keep in mind that there’s no support for ISE in PowerShell v6 and beyond (remember when I said, it’s fine if you use v5? That’s why 😉)
Cool PowerShell modules and required roles
Okay, I mentioned different modules quite often in this blog already, but haven’t explained what’s behind it.
And I sweat that this is really the last thing we need to understand and prepare, before we can start using PowerShell 😊
Think of a PowerShell module as a package of related scripts, cmdlets, functions, variables, and other tools that you can easily reuse in different scripts or on different machines. It’s like having a toolbox where each tool is designed for a specific task, and you can bring it out whenever you need it.
If you want to use certain cmdlets, you need to import them first. And usually you don’t import single cmdlets, but modules. Of course, you get modules in the so-called internet and the best way is the PowerShell Gallery. It’s a central repository for sharing and acquiring PowerShell scripts and modules. Microsoft has a great documentation around it, including how to get started, different How-To’s and so much more. Check it out, if you want to know more about the Gallery.
Required roles
For using cmdlets you need admin access, we just covered that in the first part of the series. Consequently, you sometimes need different admin roles for different modules. This is of course irrelevant if you are a Global Admin, but if not, I have added the required admin role to each module (remember, Global Admin works for all of these). If you do not have the required role, simply contact the relevant admins. Remember, this is all about teamwork :)
As usual, thanks for reading, if you have questions, comments, and stories to share, find us on social media and let’s talk. We can all learn from each other 😊
Cool modules
There are a few modules that are must-haves when it comes to Power Platform Administration and I have a handy list for you, including the link:
- Microsoft.PowerApps.Administration.PowerShell (Power Platform Admin) This one is packed with cmdlets around administering Power Platform and you will need (and love) it.
- Microsoft.PowerApps.PowerShell (no Admin role required) This one is more aimed towards makers who want to use CLI to manage their own apps and flows.
- MSCommerce (Billing Admin) This one is for accessing Microsoft Commerce APIs and will be necessary later for working with self service purchase licenses (you usually don’t want them in your tenant).
- MSAL.PS (Power Platform Admin) With this module we can build cross tenant isolation reports. Again, this is something we will cover in a later blog post.
- ExchangeOnlineManagement (Exchange Admin) As the name suggests, we can connect to exchange online, which is really handy if we want to activate the audit logs for Power Platform
I will always note the required module at the beginning of the following blog posts so that you always know directly what we will need.
A word about imports and updates
You will often find scripts that start with the cmdlet Import-Module -Name ExampleModule. That was used to import the current module into the PowerShell session. But since PowerShell 3.0 this is not necessary anymore and happens automatically. This feature is called module auto-loading.
Updates on the other hand are a different story. PowerShell modules (like Microsoft.PowerApps.Administration.PowerShell or MSCommerce) might get updated from time to time and you want to make sure to work with the latest version. Or most likely you want to, sometimes newer versions will have a significant change, that may cause existing scripts to break.
You can update a module with cmdlet Update-Module -Name ExampleModule but it’s not recommended to include that to every script you run, because it slows down the performance significantly. I usually recommend updating your modules from time to time, or at least check the PowerShell gallery, since this documents all updates. It depends on the module, how often you should check for updates, so there is no rule of thumb for every module. If you use them on a regular basis, maybe check online once a month or so.
Okay, now that you can make an informed decision about whether to use classic PowerShell or PowerShell ISE and you know a bit about modules, we can start into using our first cmdlets, right? And for that we’re going to introduce variables and pipelines, it’s gonna be exciting 😃
Variables and Pipelines
Like in every good scripting or programming language we can use variables in PowerShell. A variable is a placeholder for storing a value that can be changed during the execution of a script. In PowerShell variables are denoted with a $ sign. Some people prefer to define their variables at the beginning of the script, others define them just before they need them. Both is equally fine.
In the following example we’ve created a variable called environments and we store the value from the cmdlet Get-AdminPowerAppEnvironment in it.
$environments = Get-AdminPowerAppEnvironment
So far, so good.
Now let’s talk about another very important feature, the pipeline.
In PowerShell, a pipeline is a mechanism for passing the output of one command as the input to another command. It’s symbolized by the pipe character |. This allows for a sequence of commands to be executed in a streamlined fashion, with each command in the pipeline performing an action on the data and then passing the modified data to the next command.
It’s important to know that commands will always be passed from left to right. The output from Command-1 will be passed to Command-2 and that output will be passed to Command-3:
Command-1|Command-2|Command-3
Real-life example
Let’s see how both of these concepts look in a real life example:
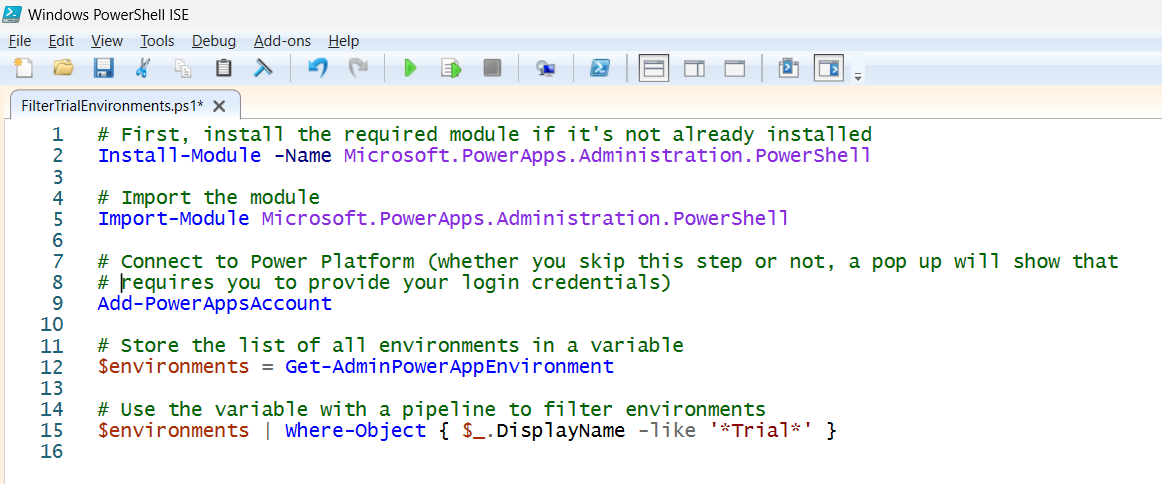
# First, install the required module if it's not already installed
Install-Module -Name Microsoft.PowerApps.Administration.PowerShell
# Import the module
Import-Module Microsoft.PowerApps.Administration.PowerShell
# Connect to Power Platform
Add-PowerAppsAccount
# Store the list of all environments in a variable
$environments = Get-AdminPowerAppEnvironment
# Use the variable with a pipeline to filter environments
$environments | Where-Object { $_.DisplayName -like '*Trial*' }
Let’s have a look at the last two steps:
Line 12: We create a variable called $environments that contain all the environments in our tenant.
Line 15: We then use the $environments variable with a pipeline to filter the environments using Where-Object. The $_ represents each item in the pipeline (in this case, each environment), and -like ‘*Trial*’ is the condition to filter environments that have ‘Trial’ in their display name.
Never realised you could do ForAll loops in PowerShell. Sweet.
Bonus chapter
To actually see the output, let’s put it in a table, using the Format-Table cmdlet.
Once again, we will use the variable $environments and pass the output with a pipe to a new cmdlet:
‘$environments | Format-Table -Property DisplayName, Location, Type’
(You can use the different ways we already know to get information about the Format-table cmdlet, if you like 😉- if not, we basically create a table and include the information on what columns should be used. In this case we want to see the display name, the location and the type).
On my demo tenant I have currently only two environments and they’re both located in the US (don’t ask why the type isn’t shown properly here 🙃)
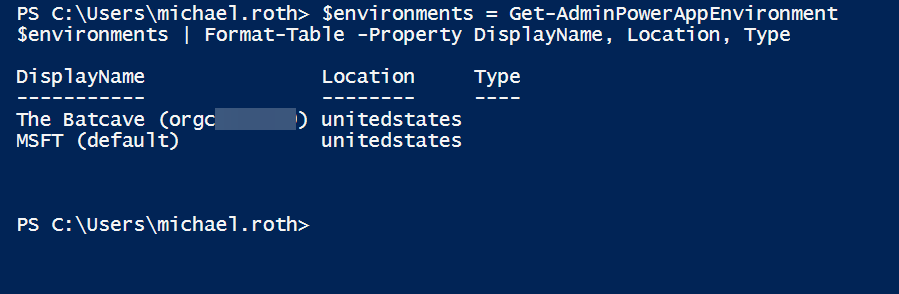
You have an environment called The Batcave? Amazing! Anyway, you can extend things like this further to output the results to a csv file. Pre-Azure, I hooked up a nifty process in SSIS that ran a script each morning to get users with a Power BI license. The results were output to csv then ingested into the SSIS package to add the data to SQL tables. Power BI on top of that, and we had a pretty nifty monitoring report.
That all starts with the cmdlet and a very simple additional. Using Michael’s example:
‘$environments | Format-Table -Property DisplayName, Location, Type | Export-Csv –Path “yourpath\Environments.csv” -NoTypeInformation; Write-Host “Results exported to environments.csv”
Craig’s additions
Craig has given us a pretty good example of how the export to csv works. The cmdlet Export-CSV requires a path, where the CSV should be stored. For example:
Export-Csv –Path “C:\Users\michael.roth\Environments.csv” -NoTypeInformation
That will create the file Environments.csv (when you export to csv with Powershell, it usually creates a first line of meta data that isn’t necessary. The -NoTypeInformation parameter at the end will just get rid of that additional information). Of course, you can choose how to name the csv file, but remember to include the .csv at the end 😉
He also used the Write-Host cmdlet and added a string (a line of characters). When the script is done, it will print this string to the terminal.
Craig’s challenge
This will bring us to our first challenge. Can you take the script that we’ve written in the beginning and change it in a way that the message in the terminal always shows the correct location and name of the file? This is the script:
# First, install the required module if it's not already installed
Install-Module -Name Microsoft.PowerApps.Administration.PowerShell
# Import the module
Import-Module Microsoft.PowerApps.Administration.PowerShell
# Connect to Power Platform
Add-PowerAppsAccount
# Store the list of all environments in a variable
$environments = Get-AdminPowerAppEnvironment
# Use the variable with a pipeline to filter environments
'$environments | Where-Object { $_.DisplayName -like '*Trial*' }'
# Put the output in a table and export it to your computer, then write a message in the terminal
'$environments | Format-Table -Property DisplayName, Location, Type | Export-Csv –Path “yourpath\Environments.csv” -NoTypeInformation; Write-Host “Results exported to environments.csv”
You can try for yourself or contact one of us to show your solution. Or even post it on LinkedIn or Twitter, just as you like. This is just a little extra for you, to check if the concept is clear or if anything is still confusing.
Conclusion
And that’s it. If you’ve followed until here, you learned already something about variables, pipes, as well as modules and the different possibilities to work with PowerShell. You can be proud of yourself.
Next week we’re going to look at custom objects use more cmdlets for different scenarios around Power Platform 🤓 Thanks a lot for reading, and if you have comments, questions, or remarks, feel free to contact Craig or myself on social media. Usually, we’re happy to chat and help and learn 😉
Michael on Twitter and LinkedIn Craig on Twitter and LinkedIn
Thank you for reading!